

အခု Guide က ပထမက ရေးခဲ့တဲ့ How To Build Android Kernel Guide ရဲ့ အဆက်ဖြစ်ပါတယ်။ အဲဒီ ပထမပိုင်းကို ဖက်ပြီးမှ ပိုအဆင်ပြေပါလိမ့်မယ်။ Kernel Source ကနေ Compile ပြီးလို့ kernel img တွေ ထွက်လာပြီဆိုရင် ကိုယ့်ရဲ့ Android ဖုန်းအတွက် Custom Recovery (TWRP) ကနေ Kernel ကို Install လုပ်ဖို့အတွက် Kernel FlashableZip တခုလိုအပ်ပါတယ်။ အဲဒီအတွက် FlashableZip Create နည်းကို ပြောပြပေးမှာ ဖြစ်ပါတယ်။ XDA Recognized Developer တယောက်ဖြစ်တဲ့ osm0sis ရဲ့ AnyKernel2 - Android Kernel FlashableZip Template တခု ရှိပါတယ်။ အဲဒီ Template ကနေ ကိုယ့်ဖုန်းအတွက် ဘာတွေ ပြင်ဆင်ဖို့ လိုအပ်လည်းဆိုတာ ဆက်ပြောပါမယ်။
How To Create Kernel FlashableZip
- အရင်ဆုံး AnyKernel2 Documentation နည်းနည်းဖက်ကြည့်လိုက်ပါ လွယ်ပါတယ်။ https://github.com/osm0sis/AnyKernel2/blob/master/README.md
- အရင်ဆုံး AnyKernel2 ကို download လိုက်ပါ။
1
git clone https://github.com/osm0sis/AnyKernel2

- ဘာတွေလိုအပ်လည်း ဆိုရင် Kernel name ပြင် ပေးလို့ရမယ်၊ device name သိရပါမယ် (eg: LG Nexus 5X ဆို device name - bullhead)၊ ကိုယ့်ဖုန်းရဲ့ boot partition location သိရမယ်၊ ramdisk ထဲမှာဆိုရင် ကိုယ့်ဖုန်းရဲ့ fstab.devicename (eg- fstab.bullhead) လိုပါတယ်၊ fstab ဆိုတာ file systems table ကိုပြောတာပါ။
- ပထမဦးဆုံး အနေနဲ့ Compile လို့ရလာတဲ့ Image.gz-dtb
/kernelsource/arch/arm64/boot/Image-gz-dtbကို Copy ကူးပြီး ခုနက AnyKernel2 Folder ထဲ Paste လိုက်ပါ။ - ပြင်ရမယ့် ကောင်တွေကို စပြောပါမယ်။
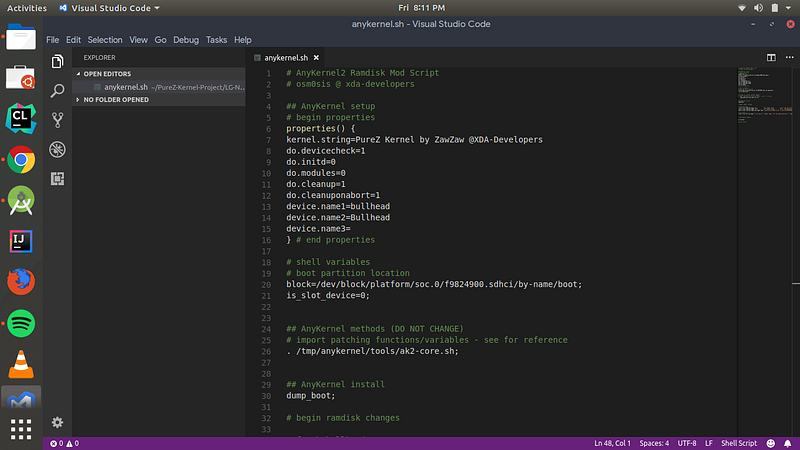
Kernel Name
- AnyKernel2 ထဲက anykernel2.sh file လေးကို Code Editor (Atom, VS Code and etc..) တခုခုနဲ့ ဖွင်လိုက်ပြီး
kernel.string= kernel nameရေးလိုက်ပါ။
1
kernel.string=PureZ Kernel by ZawZaw @XDA-Developers
Device Name
- anykernel2.sh ကိုဖွင့်ပြီး device.name1 နဲ့ device.name2 နေရာမှာ ကိုယ့်ဖုန်းရဲ့ device name ကို ရေးလိုက်ပါ။ (ဖုန်း အမျိုးအစာပေါ် မူတည်ပြီး device name ကွာသွားပါလိမ့်မယ်)
- Example: LG Nexus 5X - bullhead
1
2
device.name1=bullhead
device.name2=Bullhead
Boot partition
- ဒါက အရေးကြီးပါတယ် ကိုယ့်ဖုန်းအတွက် boot partition location ကို အတိအကျ သိရပါမယ်။ Nexus 5X ရဲ့ boot partition သည်
/dev/block/platform/soc.0/f9824900.sdhci/by-name/bootဖြစ်ပါတယ်။ anykernel2.sh ထဲကblock=/dev/block/platform/…ဆိုတဲ့ line မှာ ပြင်ပေးရမှာ ဖြစ်ပါတယ်။ (Warning: အဲဒါ အရမ်းအရေးကြီးပါတယ် ကိုယ့်ရဲ့ဖုန်းပေါ်မှုတည်ပြီး ကွဲပြားသွားပါလိမ့်မယ် သတိထားရမယ့် တချက်တခုပါ) - Example: For Nexus 5X
1
block=/dev/block/platform/soc.0/f9824900.sdhci/by-name/boot;
File Systems Table: fstab
Note: (ဒီအဆင့်က တကယ်တော့ မထည့်လည်း ရပါတယ်။ ကျော်သွားလို့ရပါတယ်။ သိအောင် တမင်တကာ ထည့်ရေးလိုက်တာ။ Kernel Install လုပ်ဖု့ိအတွက် Kernel FlashableZip ဖြစ်ရုံသက်သက်အတွက်ဆို ဒါတွေ မလိုအပ်ပါဘူး။ ဘာအတွက် လိုအပ်တာလဲ ဆိုတော့ filesystem support (e.g - f2fs support) အပိုင်းတွေနဲ့ Disable forced encryption and dm-verity လုပ်ဖု့ိအတွက် လိုအပ်ပါတယ်။ တနည်းအားဖြင့် Android File System အကြောင်း ကောင်းကောင်းနားလည်မှ ဒါတွေ လုပ်နိုင်ပါလိမ့်မယ်။ Android File System အကြောင်းကို TechX Myanmar မှာ အရင်ဆုံး နားလည်အောင် ဖက်ထားသင့်ပါတယ်။ ပြီးရင် Android partitions and file systems အကြောင်းကို AOSP မှာ အသေးစိတ်လေ့လာလို့ရပါတယ် https://source.android.com/devices/bootloader/partitions-images )
- AnyKernel2 ထဲမှာ ramdisk ဆိုတဲ့ folder လေးရှိပါတယ်၊ အဲဒီ အထဲကို အပေါ်မှာပြောခဲ့တဲ့အတိုင်း Nexus 5X အတွက် fstab (file systems table) file လေး ကို သွားထည့်ရမှာပါ။ အဲဒီ fstab file လေးထဲမှာ ဘာတွေ အဓိကပါလဲဆိုတော့ ကိုယ့်ဖုန်း ရဲ့ /system, /data, /cache, /firmware, /boot, /recovery, /persist အစရှိတဲ့
<mount_point>partition တွေ ပါဝင်ပါတယ်။ ဒီ mount_point တွေဆိုတာ filesystem path တွေပါ တနည်းအားဖြင့်် ဒီ file လေးက ကိုယ့်ဖုန်းရဲ့ android file systems table ဖြစ်ပါတယ်။ - သူရဲ့ format လေးကို နည်းနည်းရေးပြပါမယ်။ (Android 4.3 နဲ့ နောက်ပိုင်း version တွေရဲ့ ပုံစံပါ)
- ဒီထက်မက Details လေ့လာချင်ရင် AOSP မှာ အပြည့်အစုံဖက်နိုင်ပါတယ် https://source.android.com/devices/storage/config
1
<src> <mount_point> <type> <mount_flags> <fs_mgr_flags>
- Example: for Nexus 5X ( /system )
1
2
3
4
5
6
7
8
9
10
/dev/block/platform/soc.0/f9824900.sdhci/by-name/system       /system         ext4    ro,barrier=1,inode_readahead_blks=8                             wait,verify=/dev/block/platform/soc.0/f9824900.sdhci/by-name/metadata
/dev/block/platform/soc.0/f9824900.sdhci/by-name/vendor       /vendor         ext4    ro,barrier=1,inode_readahead_blks=8                             wait,verify=/dev/block/platform/soc.0/f9824900.sdhci/by-name/metadata
/dev/block/platform/soc.0/f9824900.sdhci/by-name/userdata     /data           ext4    noatime,nosuid,nodev,barrier=1,data=ordered,nomblk_io_submit,noauto_da_alloc,errors=panic,inode_readahead_blks=8 wait,check,forcefdeorfbe=/dev/block/platform/soc.0/f9824900.sdhci/by-name/metadata
/dev/block/platform/soc.0/f9824900.sdhci/by-name/cache        /cache          ext4    noatime,nosuid,nodev,barrier=1,data=ordered,nomblk_io_submit,noauto_da_alloc,errors=panic wait,check
/dev/block/platform/soc.0/f9824900.sdhci/by-name/persist      /persist        ext4    noatime,nosuid,nodev,barrier=1,data=ordered,nodelalloc,nomblk_io_submit,errors=panic wait,notrim
/dev/block/platform/soc.0/f9824900.sdhci/by-name/modem        /firmware       vfat    ro,shortname=lower,uid=1000,gid=1000,dmask=227,fmask=337,context=u:object_r:firmware_file:s0        wait
/dev/block/platform/soc.0/f9824900.sdhci/by-name/boot         /boot           emmc    defaults                                                        defaults
/dev/block/platform/soc.0/f9824900.sdhci/by-name/recovery     /recovery       emmc    defaults                                                        defaults
/dev/block/platform/soc.0/f9824900.sdhci/by-name/misc         /misc           emmc    defaults                                                        defaults
/dev/block/platform/soc.0/f9824900.sdhci/by-name/modem        /radio          emmc    defaults
- For Nexus 5X : fstab.bullhead

- အဲဒီ fstab file ကို AnyKernel2 ရဲ့ ramdisk dir အောက်မှာ ထည့်ပေးရမှာ ဖြစ်ပါတယ်။

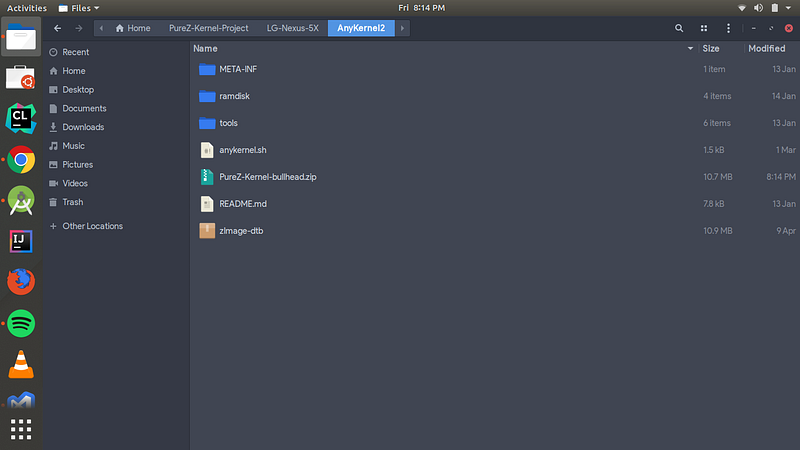
- အဲဒါတွေ အောင်မြင်ပြီဆိုရင် FlashableZip တခု Create ပါမယ်။
- AnyKernel2 folder ထဲမှာ Right Click ထောက်ပြီး Terminal ကိုဖွင့်လိုက်ပါ။
- ဒီ command လေးကို ရိုက်ပေးလိုက်ပါ။
1
zip -r9 Your-Kernel-Name.zip * -x README Your-Kernel-Name.zip

- ပြီးသွာရင် AnyKernel2 folder ထဲမှာ Kernel Flashable Zip တခုထွက်လာပါပြီ။
- ကိုယ့်ရဲ့ Android ဖုန်းအတွက် Kernel FlashableZip ကို TWRP Recovery ကနေ Install ဖို့ အဆင်သင့်ဖြစ်ပါပြီ။