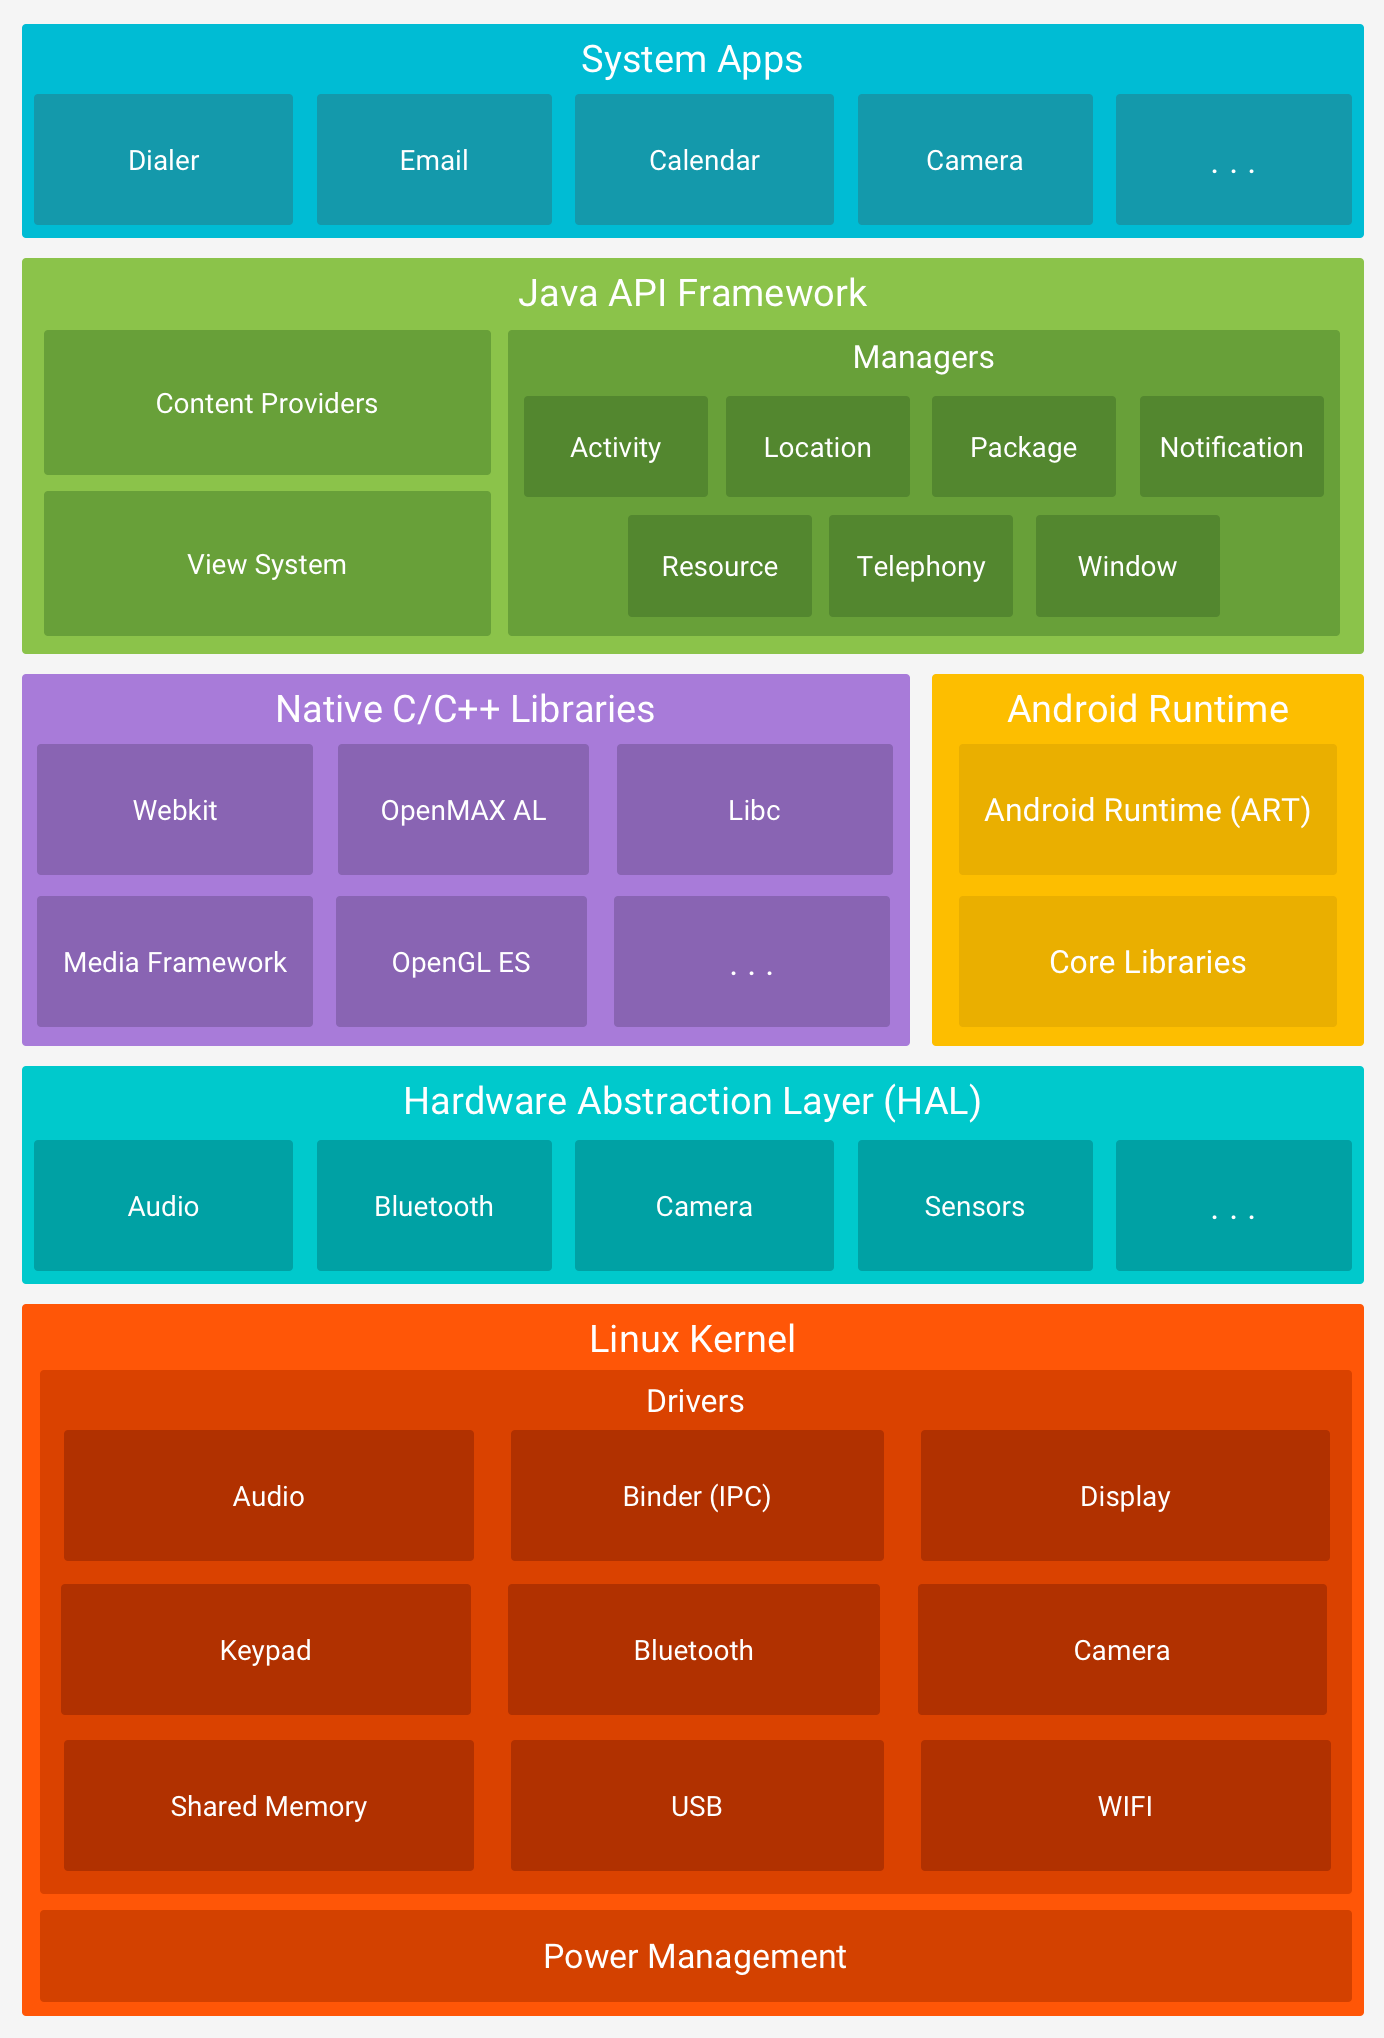
Android Devices အတွက် Kernel Source ကနေ Kernel တခု ဘယ်လို Build မလဲဆိုတဲ့ အကြောင်းအရာကို ဒီ How-To article မှာ အဓိက ပြောသွားမှာဖြစ်ပါတယ်။ Android OS က Linux Kernel ကို Based ထားပြီး Android ရဲ့ Kernel က Modified ထားတဲ့ Linux Kernel တခုပါ။ Android မှာသုံံံံံးထား Linux Kernel branch တွေက Long Term Support(LTS) branch တွေ ဖြစ်ပါတယ်။ https://www.kernel.org မှာ Long term branch တွေကြည့်နိုင်ပါတယ်။ ဥပမာ Nexus 5X, 6, 6P မှာဆိုရင် “linux-3.10-y” ဆိုတဲ့ branch ကို သုံးပါတယ် Google Pixel/Pixel XL မှာဆိုရင် “linux-3.18-y” ဆိုတဲ့ LTS branch တွေ သုံးကြပါတယ်။ Android OS က Linux Kernel ပေါ်မှာ အခြေခံပြီး တည်ဆောက်ထားတာ ဖြစ်ပြီး Kernel ဆိုတာ OS တခုရဲ့ အရေးကြီးတဲ့ အစိတ်အပိုင်းတခုပါ။ CPU, Memory, Disaply စတဲ့ Hardware အစိတ်အပိုင်းတွေ နဲ့ Software နဲ့ကြား ချိတ်ဆက်ပြီး အလုပ်လုပ်တဲ့ နေရာမှာ Kernel က အရေကြီးတဲ့ အပိုင်းမှာ ပါဝင်ပါတယ်။ Android OS Architecture ရဲ့ Linux Kernel အပိုင်းမှာ Display Driver, Camera Driver, USB Driver, Bluetooth Driver, Audio Driver, Power Management အစရှိသဖြင့်ပါဝင်ပါတယ်။ နမူနာပြောပြရရင် ကျွန်တော့််ရဲ့ Nexus 5X မှာ ပုံမှန် built-in ပါတဲ့ Stock Kernel မှာ Double Tap to Wake/Sleep / Disaply နဲ့ ပတ်သက်တဲ့ KCAL - Advanced Color Control / Audio driver နဲ့ ပတ်သက်တဲ့ Sound Control with High Performance Audio စသဖြင့် မပါဝင်ကြပါဘူး။ ကိုယ့်မှာ C Programming Skill ရှိရင် Kernel source တခု ကနေ အဲဒီ Kernel features တွေ ရေးပြီး ပြန် Recompile လုပ်နိုင်ပါတယ်။ ဒီနေရာမှာ Google ရဲ့ Nexus/Pixel လိုမျိုး Stock Pure Android ဖုန်းတွေ မဟုတ်တဲ့ တခြား Android OEMs တွေဖြစ်တဲ့ (Samsung, HTC, Sony and etc…) စတဲ့ Company တွေရဲ့ဖုန်းတွေမှာ တော်တော်များမှာ အဲဒီ Features အနည်းနဲ့အများ ပါဝင်ကြပါတယ်။ ဘာလု့ိ အဆင်သင့်ပါလဲဆိုတော့ သူတို့ရဲ့ Company က သက်ဆိုင်ရာ Android Engineer တွေက Source ကနေ Modified လုပ်ထားပြီးသားဖြစ်နေလု့ိပါပဲ။ အဲဒီ Features တွေ Device drivers - Audio, Display, Camera, USB and etc… / Memory / Power Management ပိုင်းတွေက Low-level ထိဆင်းပြီး C Programming နဲ့ရေးကြပါတယ်။ Custom Android Kernel တခု Build ရတဲ့အကြောင်းက Kernel source ယူပြီး Features တွေ ထပ်ပေါင်းထည့်ဖို့အတွက် ဖြစ်ပါတယ်။

Requirements
- GNU/Linux based Operating System(OS)
- Device’s Kernel Source
- Git: Version Control System
- GCC Toolchins (ARM/ARM64)
Kernel Sources
Kernel source တွေက ဖုန်းအမျိုးအစာပေါ် မူတည်ပြီး download ရမယ့် site တွေက ကွဲပြားသွားပါလိမ့်မယ်၊ လိုအပ်တဲ့ Link တွေ အောက်မှပေးထားပါမယ်။
- Google Nexus/Pixel ( Qualcomm Chipset Only) : https://android.googlesource.com/kernel/msm
- Google Nexus (For all Chipsets) : https://android.googlesource.com/kernel/
- Sony Xperia : https://developer.sonymobile.com/downloads/xperia-open-source-archives/
- LG : http://opensource.lge.com/index
- Samsung : http://opensource.samsung.com/reception.do
- HTC : https://www.htcdev.com/devcenter/downloads
- Xiaomi : https://github.com/MiCode
- OnePlus : https://github.com/OnePlusOSS
- Motorola : https://github.com/MotorolaMobilityLLC
- နောက်တခုက အမျိုးမျိုးသော Android Device တွေရဲ့ Kernel source တွေ တနေရာတည်းမှာ ရနိုင်တဲ့ နေရကတော့ LineageOS ROM Community ကြီးပဲဖြစ်ပါတယ်။ (ဒါပေမယ့် တခုတော့ရှိတယ် အဲဒီ LineageOS Source ကနေ Build လိိုုက်တဲ့ Kernel တခုဟာ သူ့ရဲ့ ROM နဲ့ AOSP based ROM တွေမှာပဲ အလုပ်လုပ်ပါလိမ့်မယ်၊ ဥပမာ Xiaomi Device တွေ အနေနဲပြောရရင် သူ့ရဲ့ StockROM (MIUI) မှာ LineageOS source ကနေ build ထားတဲ့ Kernel ကို သုံးလို့ရမှာ မဟုတ်ပါဘူး အလုပ်လုပ်မှာ မဟုတ်ပါဘူး၊ ဖုန်းက LineageOS တင် ထားဖို့လိုပါယ်။
- https://github.com/LineageOS
Toolchains
Kernel Source ကနေ compile ဖို့အတွက်ဆိုရင် Toolchains တခုလိုအပ်ပါတယ်၊ Toolchains မှာ ကိုယ့်ဖုန် ရဲ့ CPU arch ပေါ် မူတည်ပြီ ARM နဲ့ ARM64 ဆိုပြီး ၂မျိုး ရှိပါတယ်။ လိုအပ်တဲ့ Link တွေ အောက်မှာ ပေးထားပါတယ်။
- arm : https://android.googlesource.com/platform/prebuilts/gcc/linux-x86/arm/arm-eabi-4.8/
- arm64 : https://android.googlesource.com/platform/prebuilts/gcc/linux-x86/aarch64/aarch64-linux-android-4.9/
Downloading the Kernel Sources
ဒီ TUT ကို ကျွန်တော်မှာရှိတဲ့ Nexus 5X နဲ့ ဥပမာပေးပြီး ပြောသွားမှာပါ။ ကျန်တဲ့ဖုန်းတွေ အတွက်ကလည်း သဘောတရာက တူတူပါပဲ၊ Kernel Source download တဲ့ နေရာပဲ ကွာသွားမှာပါ။
- အရင်ဆုံး Terminal ကိုဖွင့်ပြီး ဒီ command လေးရိုက်လိုက်ပါ။ (Dir တခုဆောက်ပါမယ်)
1
mkdir KernelName
1
cd KernelName
- Nexus 5X အတွက် Kernel source download ဖို့ အတွက် ဒီ command လေး ရိုက်လိုက်ပါ။
- အရင်ဆုံး ကိုယ့် Computer ထဲမှာ git install ထားဖို့ လိုပါတယ်။
1
git clone -b android-msm-bullhead-3.10-oreo-r4 --depth=1 https://android.googlesource.com/kernel/msm
- ပြီးရင် Kernel compile ဖို့အတွက် Toolchains download ရပါမယ်။ (ဒီနေရာမှာ တခု သတိထားဖို့လိုပါတယ် ကိုယ်ရဲ့ဖုန်း CPU arch က arm64 ဆို arm64 toolchains ကို download ပါ၊ မဟုတ်ဘူး arm ဆိုရင် arm toolchains ကို download ပါ)
1
git clone https://android.googlesource.com/platform/prebuilts/gcc/linux-x86/aarch64/aarch64-linux-android-4.9
- အဲဒါတွေအကုန်ပြီးသွာပြီ ဆိုရင် Kernel build ဆို အဆင်သင့် ဖြစ်ပါပြီ။
Building the Kernel
- အရင်ဆုံး Kernel source နဲ့ toochains ကို ပထမက ဆောက်ထားတဲ့ KernelName (PuerZ-Kernel-N5X) ဆိုတဲ့ Dir ထဲမှာ နှစ်ခုလုံး အဆင်သင့် ရှိနေရပါမယ်။
- Toolchain Name ကို AOSP-Toolchains လို့ အမည်ပေးလိုက်ပြီး၊ Nexus 5X Kernel Source Name ကို bullhead လို့ အမည် ပေးလိုက်ပါမယ်။ (အဆင်ပြေသလို Rename လိုက်ပါ ပြဿ နာ မရှိပါဘူး၊ တခုပဲ Toolchains Location ပြန် ပေးတဲ့ နေရာမှာ အဲဒီ Name တွေအတိုင်း အတိအကျသိ ဖို့ လိုပါတယ်)
- e.g : Toolchains location
1
/home/zawzaw/PureZ-Kernel-N5X/AOSP-Toolchains
- e.g : Kernel Source location
1
/home/zawzaw/PureZ-Kernel-N5X/bullhead

- ပြီးရင် ကိုယ့်ဖုန်းအတွက် download ထားတဲ့ Kernel source Folder ထဲ ဝင်လိုက်ပါ။
- Right Click ထောက်ပြီး Terminal လေးကို ဖွင့်လိုက်ပါ။
- ပထမဦးဆုံး လုပ်ရမှာ Kernel source ကနေ compile ဖို့အတွက် export ဆိုတဲ့ command ကို သုံးပြီး toolchains ကို Set new environment variable သွားလုပ်ရပါမယ်။ (export - Set a New Environmetn Variable)
- Type this command (အဲဒီမှာ bin/နောက်ကကောင်ကို toochains prefix လို့ခေါ်ပါတယ် အခု Google က ပေးထားတဲ့ Toochain တွေ ရဲ့ prefix တွေကို ပြောပြပါမယ်၊ ARM အတွက်ဆိုရင် “arm-eabi-“ ၊ ARM64 အတွက်ဆိုရင် “aarch64-linux-android-“ ဖြစ်ပါတယ်)
1
export CROSS_COMPILE=${HOME}/PureZ-Kernel-N5X/AOSP-Toolchains/bin/aarch64-linux-android-
- ကိုယ့်ဖုန်းရဲ့ CPU arch က arm လား arm64 လား သိထားဖို့ အရင်လိုပါတယ်
- အရင်ဆုံး ကိုယ့်ဖုန်းရဲ့ arch ကို ပြောပေးဖို့ လိုပါတယ်။
- Nexus 5X က arm64 ဖြစ်တဲ့အတွက် ဒီ command လေး ဆက်ရိုက်လိုက်ပါ။ (တကယ်လို့ ကိုယ့်ဖုန်းက arm ဆိုရင် arm64 နေရာမှာ armလို့ ပြောင်း ရိုက်လိုက်ပါ။
1
export ARCH=arm64 && export SUBARCH=arm64
- နောက်တခုက Kernel source ထဲမှာ Compile ထား output file တွေ ရှိရင် ရှင်း ပေးဖို့ လိုပါတယ်။
1
make clean && make mrproper

- နောက်ထက်တခု သိဖို့ကတော့ ကိုယ့် build မယ့် Kernel ရဲ့ build kernel configuration ပါ။
- ARM device ဆိုရင် kernelsource/arch/arm/configs/ အောက်မှာ ရှိပါတယ်။
- ARM64 device ဆိုရင် kernelsource/arch/arm64/configs/ အောက်မှာ ရှိပါတယ်။
- Nexus 5X အတွက်ဆိုရင် bullhead/arch/arm64/configs/bullhead_defconfig (bullhead_defconfig ဆိုတာ Nexus 5X အတွက် build မယ့် kernel configuration အပိုင်းပါပဲ)
- ကိုယ့်ဖုန်းအတွက် kernel defconfig ကို သိချင်ရင် KernelSource/build.config file လေးကို ဖွင့်ကြည်နိုင်ပါတယ်။
- အရင်ဆုံး Kernel compile မလုပ်ခင် build configuration လုပ်ပေးဖို့ လိုပါတယ်။
1
make bullhead_defconfig

- ပြီးရင် Kernel compile ပါတော့မယ်၊ compile ဖို့အတွက် အောက်က command လေးရိုက်လိုက်ပါ။
1
make -j$(nproc --all)

- Compilation process time က ကိုယ့် Computer ရဲ့ CPU core ပေါ်မူတည်ပြီးကြာနိုင်ပါတယ်။
အဲဒါတွေပြီးသွားရင် Compiler ကနေ Compile လုပ်သွားပါလိမ့်မယ်။

Build လိုက်တဲ့ Kernel zImage တွေက ARM ဆိုရင် - kernelsource/arch/arm/boot/အောက်မှာ ထွက်ပါတယ်၊ ARM64 ဆိုရင် - kernelsource/arch/arm64/boot/အောက်မှာ ထွက်သွားလိမ့်မယ်။

- အဲဒါ တွေ အောင်မြင်သွာပြီး ဆိုရင် ကိုယ်ဖုန်းအတွက် Kernel Install ဖု့ိ FlashableZip ဘယ်လိုလုပ်မလဲ ဆိုတာ ဆက်ရေးပါမယ်။

